![[Walls ready-click for larger view]](images/970925n-sm.jpg)

![[Walls ready-click for larger view]](images/970925n-sm.jpg) |
| The walls of the guest villa are ready for concrete. |
Mary Ann's Tropical Building Page
September 25, 1997www.beachshack.ai
Summary:
Since our September 9th report about building on a Caribbean island, we have
Hints: Click on any small picture below to see it larger and
visit the Site Map for previous and
future progress reports, house plans, bookstore and references.

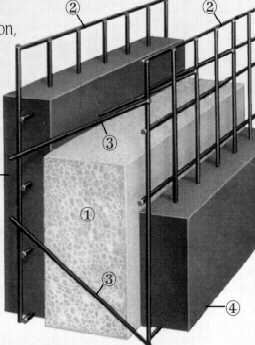
Components of the installed panel include
We
visited the 3-D sites on St. Martin and talked
to the owners in St. Thomas whose 3-D panel homes went through
Hurricane Marilyn in 1995. They said they had no damage during
the hurricane with their Insteel structures,
while concrete block walls sometimes blew in (it should be noted
that US builders do not always put reinforcing
rebar in their concrete block walls, while Anguillian builders
go overboard on rebar).
[Update: In July 1997, Insteel Industries sold the Georgia plant to the managers and exited the business. Panels are still being manufactured, however, at the same plant in Georgia.]
Step One is to drill holes in the slab for 3' lengths of rebar, which are cemented in with a special cement-glue. These rebar rods must be located in precise locations to tie into the panels. Therefore they build the slab first, then layout the walls and mark the precise rod locations. Above you can Geoff Sims-Davies cutting rebar to 3' lengths.
The crew showed up on Saturday night, ready to drill, but it was raining and the cement dust turned to muck in the rain and threatened to burn out the drills. Luckily, the next day was sunny and clear. Below is a picture of the installed rebar rods.
![[ Holding up the first wall]](images/970925c-sm.jpg)
![[levels wall- brace it]](images/970925b-sm.jpg)
![[Rod inserting a panel over pipes]](images/970925d-sm.jpg)
The panels are very light - a single man or woman can lift one into place. Since the utility conduits stick up from the slab and will go within the panels, you must first burn out slots in the foam with a blow torch. The panels are levelled and temporarily braced. They are then connected with overlapping wire mesh sheets and fastened with wire ties using a special gun.
The corners of the building are strengthened with extra mesh and rebar. The final house will have concrete posts and beams just like a standard Anguilla house. When the walls are up, extra rebar is inserted wherever a post in desired, then the foam is burned out in and concrete is added to make a structural column or beam that is also integrated with the wall mesh.
The last picture above shows the electrical conduits coming out of the floor for the electrical panel box.
![[wooden sub-frames inset for windows]](images/970925l-sm.jpg)
![[extra support at corners]](images/970925o-sm.jpg)
As described in our August 22nd report, we purchased wooden louvered windows in Puerto Rico. For each opening, the workers cut a hole in the wire mesh, cut out the foam, and build a wooden subframe, which is then stampled to the mesh. Extra wire support was added at the corners, as you can see in the picture above.
The exterior electrical work is done and the walls are now ready for concrete to be applied to the outside.
www.beachshack.ai[email protected]